Hansen and I have been talking about having our own herb garden since our first place together; five apartments ago! We move a lot.
We have been in-love with the pallet trend but didn't have anywhere in our house that fit the pallet style so we opted for a pallet planter herb garden! Whew.. that was a mouth full.
+When we finally set roots, we plan on having a garden, but for now we wanted a small herb garden we could build ourselves and transport easily. Easily being the key-word.
+Recently, we made our very own small herb garden and wanted to share it with you! Perfect for small-living, apartment lifestyle, or if you just want something that is low-maintenance!
Plus, I'm looking forward to not having to worry about scavenging the entire city looking for fresh basil or fresh thyme.
DIY: Pallet Planter
Let's get started!
+Tools & Necessities
+Pallet [2]
+Sand Paper [Grades 80 & 120]
+Hammer
+Nails [1.5 inch]
+Handsaw
+Staple Gun
+Staples [3/8 or 10mm]
+Drill
+Weed Stop Material
+Stain
+Urethane
+Staining Rags
+Measuring Tape
+Sponge brushes
+Sharpie
Important Note: If you don't have a friend/family member to borrow from or a maintenance shop at your apartment complex you can borrow from (we do this, quite often), you can rent from your local Hardware store for the day. It's inexpensive and a cheaper alternative to buying tools.
+Step By Step Instructions
Step 1: Dismantle your pallet using your guns of steel to crank out the old nails.
Seriously, this is probably the most difficult of all the tasks. You will need six boards from your pallets that measure at 44 x 6 x 0.5 or six boards of the size of your choosing.
The important part is that they are even.
You will also need two support rails that are 41.5" long.
Here's two tutorials to help you out with the dismantling!
Step 2: Once you've dismantled the pallets you'll need to remove the nails.
We used the back of a hammer and saved the old nails.
Step 3: Once the pallet has been dismantled it's time to cut them in half. Using a handsaw, evenly cut 4 of the 6 pallet boards down the middle. We measured our boards to 22 x 6 x 0.5.
Now, you should have 8 boards at 22 x 6 x 0.5.
These will be the front and backs of your boxes. Set those aside.
Step 4: The next step is to create the sides. This portion is a tad bit more difficult and will take some planning.
We opted for a flat back and angled front for our boxes. You can do whatever style you prefer.
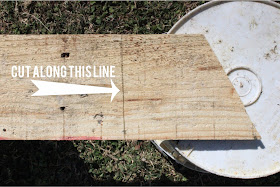
Grab 1 of the 2 boards you haven't cut yet along with two of the fronts/backs you recently cut. Lay the back piece alongside the edge of the pallet. Now, with the front piece, angle it to create a 6.75 inch long angle using a measuring tape. Mark the angled line using the marker on the outside of the board (this is an important detail).
Creating the rest of the sides is much easier because you will use the first corner you made to create the rest. You will end up using the final board you dismantled to create a total of 8 corners.
Step 5: Here's a look at all the measurements up close
Step 6: Sand the boards and corners using the 80 grade sand paper.
After sanding, use a damp cloth to remove the dust.
Step 7: Now, paint all of the boards using the staining cloth [don't forget to wear gloves] and let it sit for 3-4 hours
Important Note: It's inevitable you'll get stain on your hands. Use Goo-Gone. It only takes a little bit to remove any stain you have on your hands!
Step 8: Once completely dried, sand all the boards using the 120 grade.
After, use a damp cloth to remove the remaining dust.
Using the sponge, paint two coats of Urethane (let sit for 3-4 hours between coats).
Ta-da! Your boards are beautiful.
Step 9: Now, it's time to construct the boxes.
Align the corner to the back piece.
Using a drill with a drill bit of the size of your nails, pre-drill holes.
Once you've pre-drilled the holes, hammer in the nails to construct the box.
We added both the corners to a back board before adding the front.
Step 10: Once you've constructed all four boxes use the Weed Stop material and scissors to create the bottom.
Align the Weed Stop material with the back of boxes and two sheets to fit.
Now, with your pre-cut sheets, staple the two pieces of Weed Stop material to the bottom of each planter.
Important Note: We doubled ours up and bent down the corners to avoid ugly edges
Step 11: Finally, align the herb boxes where you want them along the rails. Drill holes into the sides of the planters into the side boards or vice versus, then hammer in the nails to secure them to the sides.
For this step we reused the old nails to add a distressed look to the sides!
Step 12: Now, that you have properly made a pallet planter aka a home for your plants, fill those babies up and watch them grow!
I know Hansen and I are really excited to have fresh herbs right outside our door this year!
Hope you enjoyed this easy DIY pallet planter!
[[What are your favorite pallet DIY?]]


